Today I was having some trouble on what to blog about. I thought I had said everything there was to say about ribbon and felt a huge writers block in my path. What more could I say? How could I find a new direction? While a great deal of my friends are fellow artists and crafters, few of them are also bloggers. Even less of those were online to help me brainstorm. Luckily, at the peak of my panic, my friend Julie popped up online. After explaining my situation to her, she threw a number of ideas my way that I had never even considered before. (Just goes to show you how a fresh perspective can really go a long way, even if they don't have any knowledge of your field.) So now, with Julie's ideas in mind, I present to you a small list of common support/awareness ribbons we see all the time but may not know the significance of. The majority of these ribbons have more than one cause attached to the color. However, I chose the most popular cause for each. It is important to note that most of these ribbons hold a different meaning outside of the United States, Canada and the UK.
Jigsaw Puzzle Ribbon
Bringing Awareness to: Autism
Meaning: The puzzle pattern reflects the complexity of the autism spectrum while the colors represent the diversity of those affected, both those with autism and their families.
White Ribbon
Bringing Awareness to: Violence against women
Meaning: White is used to symbolize purity. This ribbon is also often worn by men against domestic violence and in support of women's rights.
Yellow Ribbon
In Support of: Soldiers
Meaning: The first officially recognized support ribbon in the US, the yellow ribbon was made so after a military marching song, "Round Her Neck She Wears a Yeller Ribbon". Yellow is also used to show hope.
Pink Ribbon
Bringing Awareness to: Breast cancer
Meaning: Though initially an orange ribbon, the pink ribbon we know today is meant to promote solidarity amongst women and represents traditional femininity and hope for the future.
Black Ribbon
Bringing Awareness to: Mourning victims after an attack or disaster
Meaning: In Western culture, black has come to symbolize death. Those seen wearing black do so out of respect for the deceased.
Red Ribbon
Bringing Awareness to: AIDS
Meaning: Created by the Visual AIDS Artist Caucus for the Red Ribbon Project, red was chosen for its "connection to blood and the idea of passion -- not only anger, but love, like a valentine."
Blue Ribbon
Bringing Awareness to: Child abuse
Meaning: The Blue Ribbon Campaign got its start in Virginia by a woman who tied a blue ribbon around her cat antenna in memory of her grandson, who died as a result of child abuse. There is no known official significance for the color blue.
Rainbow Ribbon
In Support of: LGBTQ+ (lesbian, gay, bisexual, trans*, queer/questioning and more) people
Meaning: Similar to the autism awareness ribbon, the multiple colors represent and celebrate the many people and their differences under the LGBTQ+ umbrella. Originally designed with 8 colors, each was assigned a meaning. Hot pink: sexuality, red: life, orange: healing, yellow: sunlight, green: nature, turquoise: magic and art, blue: serenity and harmony, purple: spirit. Purple has also come to form it's own significance in the LGBTQ+ community as a symbol of pride and against homophobic bullying.
Orange Ribbon
Bringing Awareness to: At-risk animals
Meaning: Registered as an official trademark, the Animal Guardian Ribbon brings visibility and awareness to animals suffering neglect and abuse whose lives may be in danger. It also promotes the notion of guardianship, as opposed to ownership, of animals. There is no stated reason for the color choice.
Lavender Ribbon
Bringing Awareness to: Cancer in general
Meaning: Though the exact origin of this ribbon is difficult to pinpoint, the color has been noted to reflect the courage and strength of cancer survivors and their families and well as to honor those lost to cancer.
To see more ribbons not listed, or other causes attached to these colors, check this list out. As we can see, ribbon has much more of a use than merely to decorate gifts or clothing. It has a long history of bringing to light support and awareness for a variety of issues.

Wednesday, August 29, 2012
Wednesday, August 22, 2012
Back to School Fun
School time is approaching for tons of college students. What better than to send your kids off with a kit of ribbon and other craft supplies to keep busy? We have a board on Pinterest dedicated entirely to crafts anyone can put together. Fortunately, our Sizzling Summer Sale is still going on over at our website too! Have some crafting ideas or projects of your own? Let us know so we can add them to our Pinterest board.
Tuesday, August 21, 2012
Ribbon Words: Decoden Fake Nails
Tutorial Tuesday is upon us! This tutorial will be a little different. Since our last give-away on Facebook, we've been developing a new audience of young costumers and Eastern fashion enthusiasts. This how-to will be both for them and to expose our pre-existing audience to something new. I bring you decoden nails. What's decoden? Check out this article on Lovelyish and find out! Now, onto the tutorial.
Decoden Fake Nails


What You'll Need:
- Nail polish in desired color
- Clear nail polish top coat (with glitter, optional)
- Nail polish in desired color with thin brush for designs
- Fake nails
- Nail glue
- Accessories for decoration

Step 1.
If your nails aren't your ideal shape or length, you can cut and file them at this point. After, start by painting your fake nails with your desired polish color. I chose a pink champagne hue. Make sure to paint several coats to ensure that the clear nail isn't seen through the polish. Always let your nails dry for 10-15 minutes between each coat.

Step 2.
Next, add your top coat. I chose one with glitter to give it that extra sparkle. I recommend putting 2 layers on your nails, with 15 minutes or more of drying time.

Step 3.
Gather your nail accessories! The things you see above are polymer cane decorations for nails, which are very popular in Japan, and come in a huge array of shapes. These canes are very small and come as a long cylinder that you slice thinly to adhere to nails or whatever other items you're using them for. You can find them for very cheap on Etsy or eBay.
Once you have all your accessories (I used polymer cane slices, Swarovski Elements in SS9 and 1/16 inch white double-face ribbon), decorate away! Of course, you can use as many or few decorations as you choose. However, I always recommend to make sure the items you use are small enough for nails, preferably accessories that are specifically made for nails as they tend to hold to nail glue best. How I did my nails was I first did a little Google research on other decoden nails to get a feel for what I wanted. I then sketched out a general idea of how I wanted the nails to look. Finally, I started by doing the most complex nails first-- the middle finger, in my case. This is because it requires more drying time. I'll break down how I did each nail.
Middle Finger:
To make the drip, I used white nail art polish to outline the drip shape very roughly. It doesn't need to be exact-- that's what makes each drip unique! After outlining, I filled it in with the same polish and let it dry. As you can see in the first picture posted, it's a little bumpy. This is because when I was gluing the nail on, the design wasn't as dry as I thought! It smudged, so I had to quickly repair it. I recommend leaving nails with multiple layers to dry for several hours to a full day to make 100% sure that the entire nail is dry. Once dry, I dabbed a small drop of nail glue in the top corner of the nail and stuck a polymer bow on. Hold the polymer in place for 1 full minute and set aside to finish drying.
Pinky Finger:
I first took the white nail art polish and make tiny polkadots all over the nail. Make sure that you don't use too big of a glob. Even though the dot may look great, if it's too thick, it'll take an extremely long time to dry. The top layer may look dry after a half hour or so, but beneath that is likely very wet and will smudge if you try to put the nails on too early. With this, less is more. After being left to dry for a half hour to an hour (assuming you used a very thin, small layer to make each dot), put a small drop of nail glue at the edge of the nail and hold the ribbon in place for 1 minute, then set to dry.
Thumb:
Since nail glue dries so quickly, I put the Swarovski Elements jewels on first. I brushed the bottom edge of the nail with glue and quickly placed the gems on, starting with the middle gem and working outward. This is to make sure it looks centered. I recommend using a tweezer to put the gems on so that you don't end up smearing the glue everywhere. Plus, it makes it that much easier to place the gems exactly where you want them. Press the jewels down and hold for one minute to ensure its spot. After 5 minutes, I grabbed the white nail art polish and quickly drew 2 lines. Always make sure to clear the edges of the wand brush from excess polish. It's no big deal if you need to go back and fill it in more, but use too much and it becomes difficult remove excess paint while making sure it still looks neat. I find that it's easier to turn the nail upside down and start at the thickest part of the lines, sweeping out to create a tapered look. Doing this upside down allows you to be able to see the entire nail as you design, since doing this right side up with force your hand and the polish wand to cover most of the nail. Once complete, put it aside to dry for a few hours.
Ring Finger:
Like the thumb, I started out brushing the nail diagonally with nail glue and placing the middle jewel first (to make sure it's centered and even). Using a tweezer or your fingers, quickly stick the remaining gems on. When finished, hold the gems in place for a full minute before leaving it to dry.
Index Finger:
By far the easiest! I put a small dab of nail glue in the middle of my nail and stuck a jewel to it. Again, you will need to hold it in place for a minute, then set to dry.

Step 4.
Leave your nails to dry for at least half a day (but up to two days for those who are painting on more layers or adding more accessories) and admire your hard work!

Step 5.
Now to put them on! I set my out in order from thumb to pinky to make sure I'm putting the correct nail on each finger.Coat your nail in a layer of nail glue and stick on the appropriate nail. Press and hold in place for 1 minute. Do this for each nail. This is why it's extremely important to let your nails dry for a long period of time. If it's not completely dry, the design will smudge and all your hard work will have gone to waste. (This is what happened to me! That paint under the top layer is so tricky.)

Step 6.
Enjoy! Always carry a small tube or bottle of nail glue with you in the event one falls off.
Monday, August 13, 2012
Social Media
Lately we've been really trying to develop a presence on various social media platforms. Our Facebook page, easily the most successful, has a mere 223 fans. Our Twitter and Pinterest have much left to develop. When using social media, what do you find that engages you and makes you want to be involved with a business' page?
Our newest idea is to offer a give-away, which will hopefully expose us to a wider audience as well as allow us to give something back to our loyal fan base. We'll be giving away several spools of ribbon and hopefully some other fun surprises too!
Want to find us online? Become a fan on Facebook, follow us on Twitter or follow us on Pinterest!
Tuesday, August 7, 2012
Ribbon Works: Cat Toy / Ribbon Streamer Tutorial
Welcome to our second crafting tutorial! Today's how-to is especially for cat lovers and companions. Creating this cat toy took less than an hour and was really simple to put together. For those of you with a cat (or those who have a friend that does) and want to finally put all that scrap ribbon to use, this is the tutorial for you. If you don't have a cat or know one, this can also double as a ribbon streamer! Great for keeping kids busy.


Cat Toy / Ribbon Streamer


What You'll Need:
- Glue
- Scissors
- Stick or dowel
- Wide (1" or wider) ribbon
- Thin (3/4" or thinner) assortment of ribbon

Step 1.
Start by wrapping your stick with ribbon from top to bottom. I happened to have adhesive ribbon on hand, which makes this process much easier. If you don't have this, you can coat your stick with glue and achieve the same results. I recommend coating half with glue, wrapping, then coating the other half with glue and repeating. This way it lets you have something to hold onto while you wrap the ribbon around instead of ending up with glue all over your hand. While you wrap the ribbon around, make sure you go in a slanted direction. This will make it easier for you to get it all the way around. If you are using the glue method, set this aside to dry.


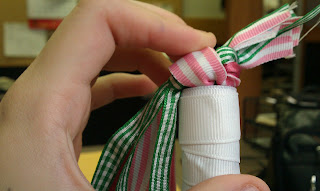
Step 2.
Grab your thinner ribbon and tie a knot at the end. There's no rule as to how many or few ribbons you should use for this, but make sure it's not too thick so you're able to tie a knot! Once this is done, you can cut the ribbons to different lengths.

Step 3.
First, make sure the stick is done drying! When you've made sure it is, coat the top of the stick with a thick later of glue. Though we used crazy glue, Elmer's works just as good-- if not better. Press the knot of ribbons to the glue and hold it in place until it's dry. I recommend holding it with a good deal of pressure for 5 - 10 minutes, just to make sure it stays in place.

That's it! Feel free to adorn your toy with rhinestones or other decorations. Just make sure they're stuck on there tight. Wouldn't want them to fall off and have the cat eat them!
Monday, August 6, 2012
Crafting for Pets
I don't know if you're a pet lover or owner, but I'm very much both. Recently, I just added two Nebelung cats to the ever growing family of my 3 pet fancy rats, 1 beta fish, boyfriend and I. We bought them a few toys but having been sick lately, I needed something to pass the time! What better than to craft some items for your pets? I began working on a hammock for the rats with ribbon. (My first time knitting with ribbon!) Now I'm in the process of creating a cat toy with just ribbon, glue and a stick. I'll be posting a tutorial for it tomorrow. For those of you with cats (or just any pet who likes to bat at swinging strings), this is just for you. It's super easy and takes care of all that scrap ribbon you've been holding on to, waiting to get rid of. While I'm working on it, what other pet items would you like to see in the future?
Subscribe to:
Posts (Atom)